If you’ve just upgraded to Windows 10, you’re probably wondering what to do next with Microsoft’s newest operating system. Here are 10 things you do before trying anything else.With the Windows 10 upgrade out of the way, you’re no doubt itching to try out Microsoft’s latest operating system to see what’s new. But the question is, where to start?
We suggest following this 10-point list of tasks once you see the new Windows 10 Desktop for the first time — it’ll help make sure everything is working as well as can be and familiarise you with the main new features.
We suggest following this 10-point list of tasks once you see the new Windows 10 Desktop for the first time — it’ll help make sure everything is working as well as can be and familiarise you with the main new features.
Step 1: Run Windows Update
You shouldrunning Windows Update again once it’s finished. If you uninstalled your anti-malware application before the upgrade (and you probably did for compatibility reasons), then if nothing else, this step will make sure the definitions for the built-in Windows Defender are bang up to date.
So click the Search box next to the Windows 10 Start button, ignore any invitation to set up Cortana and type windows update. Select Check for updates in the list of results and, when Windows Update opens, click the Check for updates button.

Windows Update works in a different way in Windows 10 and you won’t always be able to select which updates to install — most will be downloaded automatically. You can change when your PC restarts to install them, though, or just click the Restart now button at the bottom of the window to install them now.
Step 2: Turn on System Protection
System Protection (formerly System Restore) is turned off by default in Windows 10. Given that there’s no way to opt out of Windows Updates once the operating system is installed, this creates a potential problem if a future update is found to contain a serious bug. This is unlikely, but not impossible.
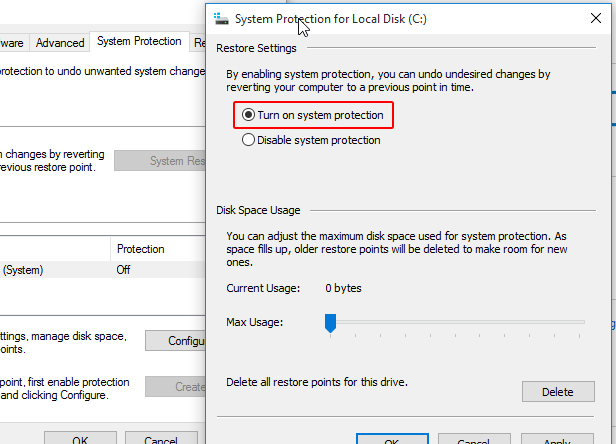
So it’s a good idea to re-enable System Protection so that you can undo a future Windows Update if you need to. Open an Explorer window, right-click This PC and choose Properties. When the window opens, select System Protection in the left pane, then select your C: drive in the dialog box that opens, click the Configurebutton and select the Turn on system protection option.
Step 3: Check the Action Centre
Windows 10 also displays important system notifications in a different way and you’ll now find them in the Action Centre — click the speech bubble icon on the Notification Area to open this. Important notifications appear at the top of this list, with new email and other alerts below.
Click any notification to see more information about it, or click Clear all at the top of the window to remove them. If you see any notifications about application or driver updates here, it’s worth seeing if they can be installed to address any potential Windows 10 compatibility issues you might face.

Step 4: Check for application updates
If you had to uninstall any software in order to perform the Windows 10 upgrade, now’s a good time to check if it’s been updated now that the operating system has been officially released — you won’t necessarily get an update in the Action Centreabout it.

There’s no easy way to do this, so it’s a case of visiting the relevant manufacturer web sites and checking the ‘downloads’ section. If you relied on your previous version of Windows’ DVD player, or enjoyed playing Minesweeper now is the time to install new applications, too — they don’t exist in Windows 10. VLC is an excellent DVD player application and the missing game can be found in the Windows Store. Use the Search tool, or this link: Microsoft Minesweeper.
Step 5: Restore the Start screen
The new Start menu means the Windows 8 Start screen is no longer the main way to work with Windows 10, but it hasn’t gone completely. If you use a tablet PC, the Start screen should appear when you disconnect the keyboard, but you can also activate manually. Open the Action Centre and click the Tablet mode button at the bottom. Voilà — instant Windows 8 experience. You return to the usual Desktop mode by clicking the Tablet mode button again.
Step 6: Personalise Windows 10’s appearance
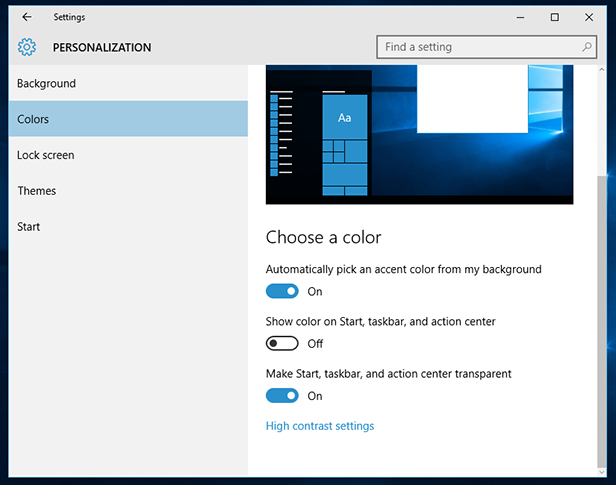
As with other versions of Windows, most aspects of Windows 10’s appearance can be customised. Right-click an empty part of the Desktop, select Personalize from the menu that appears and you’ll see a window with options for the Background,Colors, Lock (login) screen and the Start menu.
Step 7: Sign up for a Microsoft account
Windows 10 works best when you sign in with an online Microsoft account. You don’t need internet access for this to work and you can use an existing email address, but it saves certain Windows settings when you are online and helps beef up security. If you’ve upgraded from Windows 7, you’ll still be using a ‘local’ account, while Windows 8 upgraders may already have a Microsoft account.
Whatever the case, check your account settings by choosing Settings from the Start menu and then Accounts. Under the Your account section, click Sign in with a Microsoft account instead and follow the on-screen instructions to sign in with, or create a new, account. You won’t lose any settings by switching to a Microsoft account.
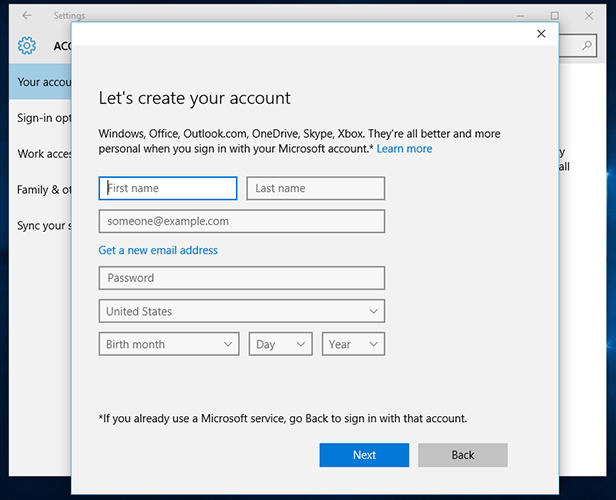
You’ll also be prompted to create a login PIN — you can skip this for now, but it’s worth doing. See #8 below.
Step 8: Set up a PIN login
If you use a Microsoft account to log into Windows 10, be sure to use a strong password, since it can also be accessed online at https://login.live.com. Using a strong password to login to Windows 10 each time, however, is tedious, so you can use a simple numeric PIN instead. The key is that this PIN can only be used to log into Windows on your PC and can’t be used to access your account anywhere else.
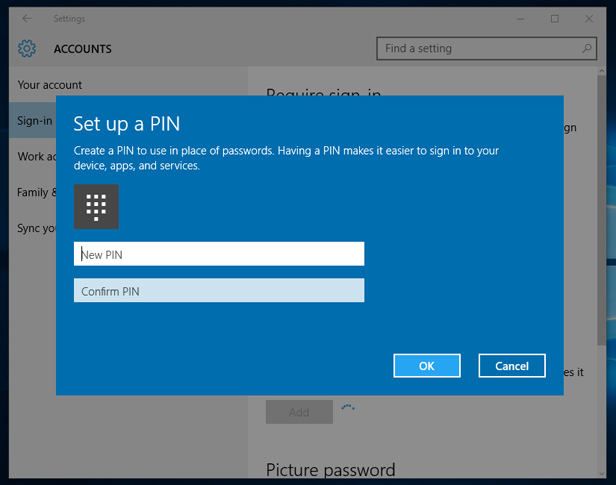
You’ll be prompted to create a PIN when you switch to a Microsoft account (see #7), else you’ll find the option at Start > Settings > Accounts > Sign-in options. Click the Add button below PIN and follow the on-screen instructions. The PIN must contain at least four digits.
Step 9: Check the Windows 10 privacy settings
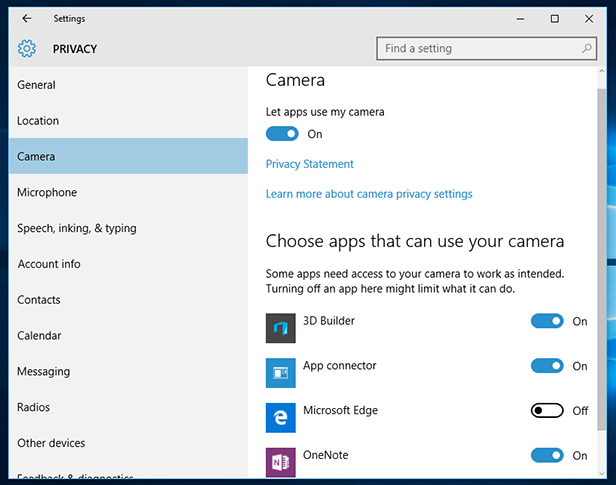
If you used the Express settings option when installing Windows 10, it’s worth reviewing its default security settings to check that you’re happy with them. You’ll find them at Start > Settings > Privacy — just click each entry in the left of the window to see more.
Switching off some of these settings will affect how Windows 10 works, so be sure to read each explanation carefully before changing it. You should also review which apps have access to certain personal data, rather than just switch off that data altogether. For example, enabling Camera will be useful for certain applications, but you may not want the Microsoft Edge web browser to have access to it.
Step 10: Revert to – or remove – your previous version of Windows
If Windows 10 turns out not to be to your liking, all is not lost. Go to Start > Settings > Update & Security > Recovery and choose the Go back to Windows 7/8 option. You’ll have this option for a month after upgrading to Windows 10, after which your old Windows files will be deleted to free up space on your hard drive.
Alternatively, if you’re happy to stick with Windows 10 and need to reclaim some hard drive space sooner rather than later, go to Start > Settings> System > Storageand click the hard drive below Storage in the main window. When the Storage usage list appears, scroll down the list and click Temporary files. Look for thePrevious versions of Windows entry and click the Delete previous versionsbutton below it — you’ll also see how much hard drive space this will save.

So will you be uninstalling Windows 10 after trying it for a few days, or have you fallen for its new features? Let us know what you think of Microsoft’s new operating system in the Comments section below once you’ve tried it.
You shouldrunning Windows Update again once it’s finished. If you uninstalled your anti-malware application before the upgrade (and you probably did for compatibility reasons), then if nothing else, this step will make sure the definitions for the built-in Windows Defender are bang up to date.
So click the Search box next to the Windows 10 Start button, ignore any invitation to set up Cortana and type windows update. Select Check for updates in the list of results and, when Windows Update opens, click the Check for updates button.

Windows Update works in a different way in Windows 10 and you won’t always be able to select which updates to install — most will be downloaded automatically. You can change when your PC restarts to install them, though, or just click the Restart now button at the bottom of the window to install them now.
Step 2: Turn on System Protection
System Protection (formerly System Restore) is turned off by default in Windows 10. Given that there’s no way to opt out of Windows Updates once the operating system is installed, this creates a potential problem if a future update is found to contain a serious bug. This is unlikely, but not impossible.
So it’s a good idea to re-enable System Protection so that you can undo a future Windows Update if you need to. Open an Explorer window, right-click This PC and choose Properties. When the window opens, select System Protection in the left pane, then select your C: drive in the dialog box that opens, click the Configurebutton and select the Turn on system protection option.

Step 3: Check the Action Centre
Windows 10 also displays important system notifications in a different way and you’ll now find them in the Action Centre — click the speech bubble icon on the Notification Area to open this. Important notifications appear at the top of this list, with new email and other alerts below.
Click any notification to see more information about it, or click Clear all at the top of the window to remove them. If you see any notifications about application or driver updates here, it’s worth seeing if they can be installed to address any potential Windows 10 compatibility issues you might face.

Step 4: Check for application updates
If you had to uninstall any software in order to perform the Windows 10 upgrade, now’s a good time to check if it’s been updated now that the operating system has been officially released — you won’t necessarily get an update in the Action Centreabout it.

There’s no easy way to do this, so it’s a case of visiting the relevant manufacturer web sites and checking the ‘downloads’ section. If you relied on your previous version of Windows’ DVD player, or enjoyed playing Minesweeper now is the time to install new applications, too — they don’t exist in Windows 10. VLC is an excellent DVD player application and the missing game can be found in the Windows Store. Use the Search tool, or this link: Microsoft Minesweeper.
Step 5: Restore the Start screen
The new Start menu means the Windows 8 Start screen is no longer the main way to work with Windows 10, but it hasn’t gone completely. If you use a tablet PC, the Start screen should appear when you disconnect the keyboard, but you can also activate manually. Open the Action Centre and click the Tablet mode button at the bottom. Voilà — instant Windows 8 experience. You return to the usual Desktop mode by clicking the Tablet mode button again.
Step 6: Personalise Windows 10’s appearance
As with other versions of Windows, most aspects of Windows 10’s appearance can be customised. Right-click an empty part of the Desktop, select Personalize from the menu that appears and you’ll see a window with options for the Background,Colors, Lock (login) screen and the Start menu.

Step 7: Sign up for a Microsoft account
Windows 10 works best when you sign in with an online Microsoft account. You don’t need internet access for this to work and you can use an existing email address, but it saves certain Windows settings when you are online and helps beef up security. If you’ve upgraded from Windows 7, you’ll still be using a ‘local’ account, while Windows 8 upgraders may already have a Microsoft account.
Whatever the case, check your account settings by choosing Settings from the Start menu and then Accounts. Under the Your account section, click Sign in with a Microsoft account instead and follow the on-screen instructions to sign in with, or create a new, account. You won’t lose any settings by switching to a Microsoft account.

You’ll also be prompted to create a login PIN — you can skip this for now, but it’s worth doing. See #8 below.
Step 8: Set up a PIN login
If you use a Microsoft account to log into Windows 10, be sure to use a strong password, since it can also be accessed online at https://login.live.com. Using a strong password to login to Windows 10 each time, however, is tedious, so you can use a simple numeric PIN instead. The key is that this PIN can only be used to log into Windows on your PC and can’t be used to access your account anywhere else.
You’ll be prompted to create a PIN when you switch to a Microsoft account (see #7), else you’ll find the option at Start > Settings > Accounts > Sign-in options. Click the Add button below PIN and follow the on-screen instructions. The PIN must contain at least four digits.

Step 9: Check the Windows 10 privacy settings
If you used the Express settings option when installing Windows 10, it’s worth reviewing its default security settings to check that you’re happy with them. You’ll find them at Start > Settings > Privacy — just click each entry in the left of the window to see more.
Switching off some of these settings will affect how Windows 10 works, so be sure to read each explanation carefully before changing it. You should also review which apps have access to certain personal data, rather than just switch off that data altogether. For example, enabling Camera will be useful for certain applications, but you may not want the Microsoft Edge web browser to have access to it.

Step 10: Revert to – or remove – your previous version of Windows
If Windows 10 turns out not to be to your liking, all is not lost. Go to Start > Settings > Update & Security > Recovery and choose the Go back to Windows 7/8 option. You’ll have this option for a month after upgrading to Windows 10, after which your old Windows files will be deleted to free up space on your hard drive.
Alternatively, if you’re happy to stick with Windows 10 and need to reclaim some hard drive space sooner rather than later, go to Start > Settings> System > Storageand click the hard drive below Storage in the main window. When the Storage usage list appears, scroll down the list and click Temporary files. Look for thePrevious versions of Windows entry and click the Delete previous versionsbutton below it — you’ll also see how much hard drive space this will save.

So will you be uninstalling Windows 10 after trying it for a few days, or have you fallen for its new features? Let us know what you think of Microsoft’s new operating system in the Comments section below once you’ve tried it.


0 comments:
Post a Comment